How to setup my VoIP function on VoIP Modem Router (TP-Link)

Login to the modem / router admin page via a web browser.
Connect your computer to the modem router.
Method 1: Wired
Connect your computer’s Ethernet port to the LAN port on the modem router via the Ethernet cable.
Method 2: Wirelessly
Use the default SSID (Wireless Network Name) and Wireless Password printed on the included Wi-Fi Info Card or on the product label of the modem router to connect wirelessly.
- Step 1
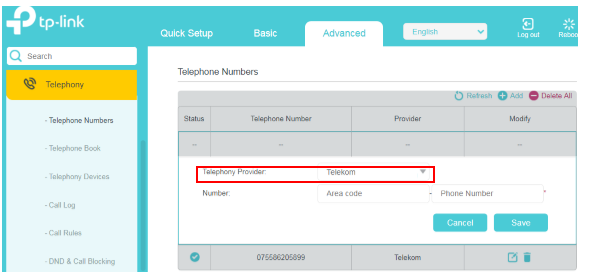
Go to Advanced>Telephony/VoIP>Telephone Numbers, and click Add.
- Step 2
Choose your Telephony Provider and enter the necessary information as required, and click Save to make the settings effective. Different telephony provider has different parameters. Please select 'Other' for configuring a Sonic Voice service.
- Step 3
Choose Other as a telephony provider if yours is not listed and fill in the parameters required. Click Save to make the settings effective.

Phone Number: The number you use to dial and answer. This is in FNN format: 612XXXXXXXX (where X is your assigned phone number)
Registrar Address: sip.sonicnet.net.au
Authentication ID and Password: Not necessary information, but if you have them, fill them in.
If the VoIP provider also provides a SIP Proxy address and an Outbound Proxy address, you can click the Advanced option and fill in the content of the Advanced option. If the VoIP provider does not provide this information, please click Save directly.

Registrar Port: Typically 5060, unless the VoIP provider specifies a different port.
SIP Proxy: Usually the domain name of the SIP Proxy Server, if not, an IP address.
SIP Proxy Port: Typically 5060, unless the VoIP provider specifies a different port.
Outbound Proxy: Usually the domain name of the Outbound Proxy Server, if not, an IP address.
Outbound Proxy Port: Typically 5060, unless the VoIP provider specifies a different port.
Register via Outbound Proxy: Typically not required to enable.
Then please click on "Save" to see if the VoIP registration is successful. If it is successful, the status of the registration entry will be a checkmark (√). If the registration fails, it will be a cross (×).
![]()
![]()
What to do if the registration fails
1. Check if the information provided by the VoIP provider is filled in the correct fields and is entered accurately. Confirm with the VoIP provider if the information is correct.
2. In the "Advanced Settings" section of the VoIP registration page, find the "Bound interface" option. Select either "Any WAN" or the Internet connection interface you are using for Internet access, for example, "pppoe_xxx" or "ipoe_xxx".

3. Check if you have enabled the "Via IPv6" option. Please disable the "Via IPv6" option and try registering again.

4. Some VoIP providers may authenticate using the phone number, so please fill in the phone number field the same as the authentication ID. Then try registering again.

Related Articles
TP-Link Archer VR400
AC1200 Wireless MU-MIMO VDSL/ADSL Modem Router Speedy WiFi – Experience superb wireless connections with 867 Mbps (5 GHz) + 300 Mbps (2.4 GHz) dual band WiFi Superior Range – Two fixed omnidirectional antennas with Beamforming technology provide ...TP-Link VR2100v
AC2100 Wireless MU-MIMO VDSL/ADSL Telephony Modem Router Super VDSL – The Latest Super VDSL (VDSL2 Profile 35b) tech delivers internet speeds of up to 350 Mbps Ultra-Fast Speed –Surpasses the WiFi speed limits of the previous generation, reaching up ...Reconfigure your existing TP-Link modem (FTTP)
These instructions are intended as a guide to reconfiguring or for setting up an existing TP-Link modem. In this article we are using the following modem and it's at the time current firmware version. Modem: TP-Link Archer VR400 Please ensure the ...Netcomm NF18MESH
NF18MESH Featuring a Gigabit WAN port as well as VDSL2/ADSL2 technologies, the NF18MESH will connect with FTTN, FTTB, FTTC and FTTH. The Gateway also features VoIP for HD quality voice calls with the capacity to connect 2 phones. Images Emulator ...WiFi Calling Configuration Checklist TP-Link Archer VR2100
WiFi Calling Configuration Checklist TP-Link Archer VR2100 When troubleshooting WiFi calling issues the following checklist can be used. 1. QoS Setup - Enable QoS in Advanced > QoS - Set bandwidth control to match actual internet speed - Add high ...